In this post, we will show you how to make your own stencil and paint it in any colour.
We are always looking for creative ways that are easy enough for beginners to follow.
To stencil your wall, you will need:
- Cardboard – slightly larger than the size of the Hexagon you want
- Marker pen
- A pointed object
- String to hold the marker pen to the pointed object at an even distance
- Painter’s tape
- Paint of your colour choice
- Paint rollers, brushes etc.
- Stanley knife or sharp blade
- Spirt level & measuring tape / rule
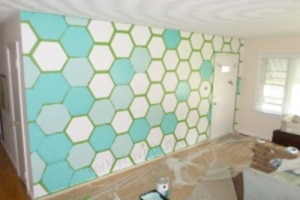
Start by making sure your wall is ready for the stencil. You will want to paint it in whatever colour you choose. This should be done using a colour that will contrast with whatever colour you plan on painting inside the hexagon (see pictures below for examples).
Paint the wall a few days before you are ready to apply the hexagon stencil, so that it has time to dry completely. Otherwise when applying the stencil it may affect the final result.
Creating The Hexagon Stencil
Place a piece of cardboard onto a flat surface and that is safe to cut on. The cardboard ,should be larger than the size hexagon that you want.
Place the pointed object into the centre of the cardboard, connect the piece of string to it, then connect the other end to the marker pen. The length of the string between the two is your radius.
By holding the pointed object in the middle, and moving the pen around, this will allow you to draw the diameter of a circle onto the cardboard.
This is the science bit. The length of the radius is also the length of each side of the hexagon.
Mark one point on the circle diameter as the starting point, then with a ruler mark the next point (a dot) on the circle diameter the distance of the radius. Keep repeating this around the circle and you will have created the six sides of the hexagon.
Join these dots with a straight line and the hexagon shape will appear.
Use the stanley knife to cut along the lines to form the hexagon stencil. Be careful with the sharp knife.
Marking Out The Wall
Find the centre of the wall by measuring the height and width, then dividing both by two. Mark the centre with a pen or pencil.
Place the stencil in the centre, make sure the top of the hexagon is level by using the spirit level. Then use a bit of painters tape to hold it in place.
Next use the painters tape to mark the outside of the hexagon stencil (all six sides).
Guide Tip: The width of your painter’s tape, will be the width of the stencil border.
Remove the template and you have your first hexagon shape. Now line the stencil up with one of the edges of the first hexagon, then repeat the process of marking the outsides with painters tape.
Keep repeating this process, stopping every 5 or 6 hexagons to check with the spirit level that you are keeping them in a level line.
Eventually, you will have stencilled the entire wall. As you reach the edge of the wall (and ceiling / flooring edges) you might have to fold the stencil to make it fit.
Work the template around any window openings or door frames.
Applying The Paint
Once the entire wall has been marked out with painters tape, it’s now time to mix your paint.
You can use slight colour shade variations to create a visually appealing pattern.
Start with one shade, then begin painting inside some of the hexagon shapes that you have taped off. Using the other shades of paint, paint inside some of the other hexagon shapes.
Once you have painted inside every hexagon shape, leave the paint to dry properly.
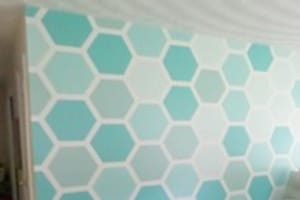
After the paint has dried, it is now time to start removing the painters tape to reveal your artistic flair.
Stand back and admire your hard work.
You can be sure that no one else will have a wall decorated in the same way or colours.